Fighting in Flanders (1917)
Synopsis
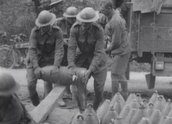
Australian soldiers prepare for a ‘stunt’ with physical exercises and rifle drill. Well-rested troops display their prowess at marching, as artillery units prepare for a major offensive against German positions east of the Belgian city of Ypres. Field Marshal Sir Douglas Haig, commander of the British Expeditionary Force in France, reviews the Australian troops on parade in the ‘back’ areas. Meanwhile, men and munitions travel forward along the Menin Road, where a headquarters is under construction in tunnels in an old mine crater, at Hooge. Australian Pioneers lay ‘corduroy’ plank roads, to counter the incessant mud. The troops pass through the once beautiful medieval city of Ypres, now made rubble by three years of artillery attack.
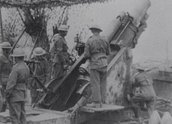
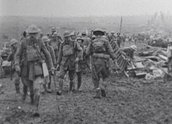
The battle opens with a huge artillery barrage on German trenches, and the deadly reply from the German guns. The camera shows the devastation. Reinforcements march forward in trenches as ambulance stretcher-bearers ferry the wounded back. Tanks lumber forward in the mud, past the wreckage of the vehicles and dead animals. Soldiers secure their positions in newly-won German trenches. Hundreds of German prisoners help to carry the wounded back. Many of the Germans are also wounded. They are searched, fed and given medical attention before being escorted back behind the lines.
Curator’s notes

The war on the Western Front entered a new phase with the Third Battle of Ypres – also known as the Battle for Passchendaele. So did the Australian effort to capture these momentous events on film, for future generations. The Australian divisions had been decimated in the latter half of 1916 during the Battle of the Somme, especially in the campaign to take Pozières (see Australia in France, Part One, With the Australians in France 1916 and Bapaume to Bullecourt). These men were all volunteers. Australia had also had since 1911 a system of compulsory military training for all males from ages 12-26, but these men were not allowed to be sent overseas. The Australian Prime Minister, WM Hughes, had attempted to change that to allow overseas service, but the Australian people voted no in a plebiscite in October 1916. The ever-determined Hughes reworded the proposal and set a date for a second plebiscite, in December 1917.
Fighting in Flanders was filmed in the middle of the acrimonious debate running up to the plebiscite, but it does not appear to have been part of the campaign to persuade the Australian public to vote yes. Hughes was certainly using filmed propaganda for that purpose in cinemas in Australia at the time, but this film was almost certainly not completed in time. Films shot in the middle of 1916 were not completed until 1917 in London, so it may be that Fighting in Flanders was not seen in Australia at all during the war. The first mention of it in newspapers in Australia is probably in July 1920, when it was advertised in The Sydney Morning Herald as part of a week-long season of official war films at the Theatre Royal, some of which were introduced by Australian generals who took part in the battles. General Sir Charles Rosenthal, an artillery commander who was gassed at Passchendaele, introduced the film on that occasion. If there were earlier screenings, I have not found a record.
While the film’s uses at the time may be unclear, it is obvious that there was a new photographic eye at work on the battlefield – that of Frank Hurley. He shot most of the scenes in this film and his approach was distinctive, far more pictorial than that of his predecessor, Herbert Baldwin, the first official Australian photographer on the Western Front. Hurley was already famous before his appointment. He had been to the Antarctic with Douglas Mawson between 1911 and 1914. He then joined Ernest Shackleton’s Imperial Trans-Antarctic expedition from 1914 to 1916, during which he filmed the break up of the ship Endurance. His film and photography of the expedition made him world famous. When Herbert Baldwin retired from the battlefield in June 1916, his health and nerves shattered by the Battle of Messines (see The Australians at Messines, 1917), Mawson recommended Hurley to take his place.
Hurley walked into an ideological and political battlefield, as well as a quagmire, when he arrived in northern France. The Australian official correspondent, CEW (Charles) Bean, had been fighting the War Office and the General Headquarters of the British staff for more than a year over the right to take photographs. He had been able to take his own photographs during the eight months of Gallipoli in 1915, but the Western Front was much closer to England, and much more restricted. Correspondents were barely allowed to visit the battlefields in 1915, and photographs were initially banned outright. This policy began to change in 1916, due to new commanders and pressure for more recruits. Herbert Baldwin’s appointment came only after months of Bean’s quiet campaigning, lobbying everyone from General Haig to the prime ministers of Australia and Great Britain, insisting that Australia must have its own photographer to concentrate solely on the Australians efforts. Due to the power of Max Aitken, the Canadian-born press baron who became Lord Beaverbrook, the Canadian forces had their own photographer from early in 1916. Bean simply demanded the same rights. When he finally succeeded in getting one, Baldwin could not take the strain. That tells us something about both Bean and Baldwin, since Baldwin was a veteran of war photography, and a courageous photographer in the field (according to Bean). Bean was intensely frustrated during the battle for Messines that Baldwin’s illness prevented him getting proper photographic records of the part the Australians played in that battle, particularly the tunnellers (see Beneath Hill 60, 2010). Baldwin returned to England in June 1917 after eight months’ work, so Bean began searching for a replacement.
In fact, he decided around this time that he needed two photographers, in order to solve another problem. Bean had clashed repeatedly with Ernest Brooks, an Admiralty photographer he ‘borrowed’ in 1916, over Brooks’s desire to take pictures for publicity purposes. Brooks was an experienced newspaper photographer, for whom ‘faking’ was simply part of the job of maximising visual impact, but Bean was already thinking more as the official historian. He wanted ‘truthful’ pictures for the official record, which he came to regard as ‘sacred’. Photographs for recruitment and propaganda such as Brooks concocted were useless to this task. By mid-1916, Bean wanted to separate these two functions – one photographer for press work, another for the records.
In his diary for 6 August 1917 (AWM38, 3DRL 606/84/1, p75), Bean gives credit for this idea to an old friend, Brigadier-General Tom Griffiths, who was in charge of the Administrative Headquarters of the AIF in London. ‘Griffiths has suggested a second young photographer’, he wrote, ‘a young officer from the AFC (Australian Flying Corps) who is colour blind. I have put to White (Lt General Sir Brudenell White) and Faunthorpe (Captain John Faunthorpe, Military Director of Cinematograph Operations at General Headquarters) a scheme by which the senior photographer is responsible for the picturesque and press work; and the junior for seeing that every historically important place or event is recorded – two quite different departments. The British don’t – or haven’t begun to – attempt to keep the latter sort of record – an irremediable loss. We have kept it after a fashion.’ Those comments are interesting: Bean felt that he was ahead of the British in the use of photography for historic record.
The young air force officer was George Hubert Wilkins, a South Australian who had almost the same credentials as Hurley, except in the Arctic rather than the Antarctic. Wilkins, born in 1888, had filmed during the Turkish-Bulgarian war of 1912, for Gaumont Film Company. He then joined the ill-fated 1913 expedition led by Vilhjalmur Stefansson to explore the Arctic. Wilkins survived a harrowing three years with Stefansson, a Canadian, but 17 other members of the expedition didn’t. When news of the war reached Wilkins, he returned to New York and took a ship for London. This boat was torpedoed and sank in the mid-Atlantic, but Wilkins survived in a lifeboat which was picked up the next day. In London, he met Frank Hurley for the first time, through Lady Kathleen Scott (widow of ‘Scott of the Antarctic’). Hurley had been through his own misadventures with Shackleton, surviving two years in the Antarctic after the wreck of the Endurance.
Hurley and Wilkins became firm friends. Although very different in temperament, they shared a taste for adventure, had great tolerance for physical discomfort and no lack of courage. Each was largely self-made in his range of skills, and highly competent in photography. They were perfect for what Charles Bean wanted, especially in that they were Australian. Both Brooks and Baldwin were British newspaper photographers, whom Bean felt did not share his native interest in the Australian troops. Hurley and Wilkins would not have to be coaxed, and they would know how to talk to Australian soldiers.
Wilkins was desperate to join the newly formed Australian Flying Corps, but his colour blindness prevented him flying. Simon Nasht, in his biography of Wilkins, The Last Explorer (2005, Hachette, ISBN 9780733622427), believes Hurley may have recommended Wilkins to Bean. Bean’s diary indicates Tom Griffiths made the suggestion, but Hurley may have made the suggestion to Griffiths. In any case, Hurley and Wilkins sailed across the English Channel on 21 August, to be met at Boulogne Harbour by Charles Bean. Hurley was the senior man, and his job was to do the press and propaganda pictures. Wilkins was to be the record photographer, directly attached to Bean. A hut was under construction to house both men near the village of Steenvoorde in northern France, with darkroom. Hurley was expected to range more freely than Wilkins, with a car and driver, but in practice, both men often travelled together, and often with Bean. Both men also shot pictures and film for both publicity and records purposes. The distinction that Bean intended in the way each man worked was never as clear on the ground.
In effect, Bean structured this arrangement so that Hurley took the weight of the demand for popular images of the war, both still photographs and cine film. That would allow Bean and Wilkins to get on with the more important task, as he saw it, of collecting for the Australian war museum he was hoping to see built after the war (which became the Australian War Memorial). Nevertheless, both men answered to Bean, not the General Headquarters, a point that had been established in a minor skirmish when GHQ sought an assurance in March 1917 that Herbert Baldwin was under the direct control of the intelligence section of GHQ, not Bean. The letter was from Lt-Colonel Hutton Wilson, the chief press censor, to Major-General Brudenell White, the Australian Corps Chief of Staff, and Bean’s closest friend and ally in the Australian headquarters. Bean notes in his diary (AWM38, 3DRL 606/73/1, 6 March 1917, p 14) that ‘White had written him back – at once – just exactly what he thought, without stopping to be discreet.’ In fact, all photographs had to be censored anyway, so that the army still retained control of what they could show.
As senior man, Hurley’s task did not include faking pictures, a point that would lead to considerable friction between Hurley and Bean, until Hurley left to photograph alone in Egypt and Palestine in late 1917. Wilkins stayed on in France and made an immense contribution to the Australian war records, but in these first few weeks, Hurley took the running. He shot most of the scenes in Fighting in Flanders, judging from the diaries kept by Bean and Hurley.
In the first two months in France, both Hurley and Wilkins produced exceptional work, especially in still photographs, but Hurley was soon frustrated by his inability to capture the whole terrible scope of what he was seeing. His solution was to create composite pictures, blending elements from several negatives in the darkroom. Bean was horrified and the two men had such vehement arguments that Hurley resigned after just six weeks, on 2 October 1917. His diary makes clear that this was a tactical resignation, as he intends to ‘await the result of lighting the fuse’. He kept working and the next day photographed the staff at Anzac headquarters, which seems a remarkable coincidence. His diary records that he spoke with General Sir William Birdwood, the commander of the Australian forces, who ‘said he hoped to fix matters up’. Hurley then notes: ‘I am however, inflexible, and if my end be not obtained, under no consideration will I remain in office’. A compromise allowed Hurley to show only six composites, some of which were included, with full-disclosure labels, in an exhibition of Australian war photographs and paintings in London in 1918. Hurley retracted his resignation and continued to work in France until December, when he was sent to cover the Australians in the Middle East.
Fighting in Flanders was largely shot before this controversy erupted in early October. Bean, Wilkins and Hurley cooperated harmoniously in the final weeks of September, as the Australians pushed hard against German positions in Polygon Wood, heading towards Passchendaele. The film is both more graphic and more pictorial than any of the earlier films from 1916. That is largely Hurley’s influence. He was appalled and fascinated by the horrors of the battlefields east of Ypres, and the destruction wrought on Ypres itself by three years of shelling. In photographic terms, it was incredibly photogenic but almost impossible to convey. He and Wilkins soon became renowned for the risks they took, trying to get footage of exploding shells as they fell. They were nearly killed on several occasions. In his diary for 26 September, Hurley wrote:
Yesterday we damned near succeeded in having an end made to ourselves. In spite of heavy shelling by the Boche we made an endeavour to secure a number of shell-burst pictures. Many of the shells broke only a few score of paces away, so that we had to throw ourselves into shell holes to avoid splinters … I took two pictures by hiding in a dugout, and then rushing out and snapping. [One of these shells hit a dump of 4.5 shells and] up went timber, stones, shells and everything else in the vicinity … The frightful concussion absolutely winded us but we escaped injury and made off through mud and water as fast as we possibly could. Egad, I’ve never heard such a row in my life.
The Battle for Menin Road was one of the bloodiest for Australian troops. In just over a week, the AIF lost almost 11,000 men, killed or wounded.
- Overview
- Curator’s notes
- Video 3 clips
- Find a copy
- Comments 3
- Map
- Extras
- Add your review