The Australians’ Final Campaign in 1918 (c.1919)
Synopsis
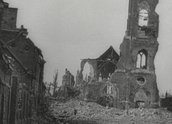
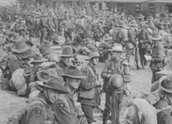
The footage spans from September 1917, after the Third Battle of Ypres, to almost the end of the war a year later. Soldiers dig and revet trenches, laying duckboards to bring the trench floor above the mud. Railway crews build light-rail lines to the front, and smaller tramways where the trolleys may be pushed by hand. Dugouts and strong points are cemented and strengthened in anticipation of a German spring attack. This comes in late March 1918 and forces the British and French armies back beyond the river Somme. The Australians retake Villers-Bretonneux in late April, but the town is all but destroyed in the shelling. Concealed trench mortars within the town retaliate on enemy positions 275 metres east of the town. Engineers and Pioneer battalions repair bridges and roads damaged in the German advance. Soldiers behind the lines forage for vegetables in gardens left untended. The 9th Brigade, comprised mostly of men from New South Wales, holds a water carnival on the Somme, one day before moving up into the line.
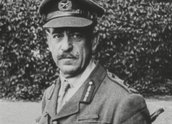
In May, General Sir William Birdwood is promoted to command the British Fifth Army, leaving the Anzac Corps which he has commanded for most of the war. General John Monash becomes the first Australian commander of the Australian troops. He is later knighted in the field by King George V, as the Allied armies push the German forces back to their former defensive stronghold, the Hindenburg Line. The Australian Prime Minister, Mr WM Hughes, visits the Australians soon after they retake Péronne. The Australians in Péronne celebrate with a sports carnival. In late September 1918, the Australian forces break through the German defences at Gillemont Farm, part of the Hindenburg Line. The official photographer, Captain Hubert Wilkins, and his assistant Sergeant Joyce are slightly wounded in this action, one of the last battles for the AIF in the First World War.
Curator’s notes

In the latter part of 1917, Australia had two official photographers on the Western Front in Belgium and France, Frank Hurley and Hubert Wilkins. Both were fresh from expeditions in the Polar caps – Wilkins with the Canadians in the Arctic, Hurley with Ernest Shackleton in the Antarctic. Hurley, with the honorary rank of captain, was the senior man on the battlefield, with Wilkins the designated assistant, but in practice, they were independent equals doing different jobs. The official Australian war correspondent, CEW (Charles) Bean, wanted Hurley to do the press work, taking pictures for the day-to-day needs of publicity and propaganda. These pictures, to Bean, were of little value in the long run. Wilkins was to be the official ‘record’ photographer, capturing the documentary evidence for future generations of where the Australian forces had been and what they had done.
Bean wanted pictures of every significant site, every battalion, battlefield and knoll they fought for. These were the more important pictures, because they would show the fields of battle before they changed in peacetime. This was close to an obsession with Bean, who had been immensely frustrated at the difficulties getting good photographs of the Australians at Pozières in 1916, and at Messines in 1917. At the first battle, Bean had to borrow British photographers; at the second Herbert Baldwin, the first official photographer for the Australians, fell ill. Bean himself was a competent photographer but no correspondent was allowed to shoot photographs on the Western Front, by order of the British General Headquarters (GHQ). That is why he fought for the appointment of two official Australian photographers, through the middle of 1917.
In his determination to have a complete photographic record, he was ahead of most on the British side. The British film The Battle of the Somme (1916), released in August 1916, had shown the British generals and politicians the propaganda power of cine film, but few had recognised the medium’s worth as historical document. Bean did, at least in terms of still photographs. The Canadian-born millionaire, Sir Max Aitken, owner of the London Evening Standard and the Daily Express, certainly saw photography’s potential, but he was concentrating on securing the heroic legacy of the Canadians in the war. Aitken set up the Canadian War Records Office in London in early 1916, and the Canadian example had some influence on Bean’s decision to lobby for an Australian War Records Section, which was set up in May 1917. Max Aitken became Lord Beaverbrook in 1917, and his influence and ambition expanded to a degree that concerned Bean.
Beaverbrook was given charge of the Cinema Committee, overseeing the work of all British cinematographers on the Western Front. Bean went to London on 18 November 1917 to establish a photographic branch of the AWRS. One of his first tasks was to see Beaverbrook about securing the negatives, and one positive, ‘of our cinema films for record purposes’. Dudley McCarthy, in his biography of Charles Bean, From Gallipoli to the Somme – the Story of CEW Bean (1983, John Ferguson, ISBN 0 909134 58 8), writes that Bean was angry that Beaverbrook had ‘managed to have a Canadian officer appointed to (General) Haig’s staff with responsibility for many matters relating to the photographers at work in France’, without consulting the Australians, or offering them a place on the Cinema Committee. Similar moves were afoot, he believed, to take control of the stills photographers. In effect, in Australia’s case, Hurley and Wilkins were both stills and cine photographers. Bean had already fought a defensive action against a senior officer at GHQ who wanted the Australian photographers under headquarters control. He was not about to lose his men to Beaverbrook’s control. In his diary entry for 20 November 1917 (AWM38, 3DRL606/94/1, pp 20-27), Bean wrote:
Beaverbrook now wants – he told us – to establish a similar committee of control over the photographs. His idea is to have one big exhibition of pictures covering the whole front. This is to be taken by a staff of photographers of whom the committee is appointing six British ones. The Canadian, Australian and New Zealand photographers are to go under the control of the committee and the committee will send an editor to manage the whole. They will bring the salaries of all photographers up to ₤12 a week. And they propose to hold this exhibition in February. This was the first word we had heard of any such thing. Beaverbrook knew that we Australians were preparing to hold an exhibition and that Hurley had gone to Egypt to get photographs for it. He told us so. But neither he nor Lytton (the new censor at GHQ) had said a word of it. Lytton asked me if we would object to Hurley being asked to do work on composite pictures outside the Australian area (we objected to them 'inside’) – and I wondered at the time what he meant. Of course he knew of this plan then – but he said nothing.
I told Beaverbrook that he clearly had us in his hand as far as the exhibition went – their exhibition killed ours. The Canadians had had theirs – now they wanted to scoop in ours. We had no objection provided they gave us unlimited scope.
But one thing we could not agree to was that they should control our photographers – we have our own policy, records and no 'faked’ pictures except such as are clearly stated in their titles to be faked.
Earlier in the same day’s entry, Bean wrote with considerable annoyance that he had been told Beaverbrook ‘had seen Hurley’s work and wanted to take him in under his own control … I did not believe this. Something Hurley afterwards said made me wonder if it were not true – it looked as if Hurley had had an offer made to him by the Canadians – of all this we knew nothing whatever.’
This passage by Bean is the tip of a large and ongoing argument – in fact, several arguments – but it makes one thing clear. Hurley was not sent to Egypt to get him out of the grasp of Beaverbrook, because he was already there when Bean realised what was happening, with the idea for a new committee to control stills photographers. What it does raise is the possibility that Beaverbrook’s idea was an elaborate manoeuvre to bring Hurley out from Bean’s control, so that he would be free to make more composites for Beaverbrook, who shared none of Bean’s qualms about ‘fakes’.
This argument about composites – single images made in the darkroom by combining elements from several negatives – had boiled over in France in the previous month. Bean would not have composites at any price so Hurley resigned, thus forcing a compromise which was only resolved by General Birdwood. For the upcoming Australian exhibition, Hurley would be allowed to include only six composite pictures, which were to be clearly labelled as composites. Hurley kept working in France until 9 November, when he left for six weeks work in Palestine. Bean’s diary entry for 20 November suggests that Hurley, Beaverbrook and the censor, Neville Lytton, had discussed Hurley going to work for the Canadians some time before this meeting, which is part of what infuriated Bean. It’s possible that Hurley or Beaverbrook foresaw that Bean would be opposed to letting Hurley go. Putting all the British photographers under Beaverbrook’s control, via a new committee, would take the matter out of Bean’s hands – except that Bean was not inclined to be sidelined so easily. Bean seems to have realised during this meeting what was afoot with Hurley and moved decisively to prevent it.
Why is any of this important? Firstly, it tells us that photographs had become very important indeed to the war effort, or at least to the credit that each country wanted to claim for its efforts. Beaverbrook wanted Hurley’s talent for composites on the Canadian side; Bean would not let that happen. It also suggests Hurley’s departure from the Western Front may have been more complicated than even Bean knew.
Bean and Hurley had clashed repeatedly over the question of veracity. Hurley had staged a strategic resignation, then forced Bean to compromise (six composites were to be allowed). Hurley had also been talking behind Bean’s back to the Canadians. Bean writes that Hurley was sent to Palestine to get pictures for an upcoming Australian exhibition, to be staged first in London, then in Australia. That may have been a convenient way to get him out of Bean’s hair – a mutually acceptable solution that left Bean free to work with Wilkins, with whom he got on well, and gave Hurley the freedom to operate independently of Bean. Or it may have been Hurley’s strategic withdrawal, while he waited for Beaverbrook to take control of all British photographers, including Hurley. Bean made sure that did not happen.
This sheds light on the character of both Bean and Hurley, particularly Bean’s determination to oppose powerful forces when they went against what he deemed were Australia’s interests. Ian Jackson, a curator of photographs at the Australian War Memorial, says that Bean did not just object to Hurley’s use of composites:
These were in any case a fairly small part of Hurley’s output. Wilkins also more discreetly used composite techniques at times. Bean also objected to Hurley’s tendency to stage and misrepresent photographs and scenes … and he objected to Hurley’s self-promotion. Bean accused him of taking credit for Wilkins’s work and feared that the work of the Australian War Records Section would be overshadowed by Hurley’s self-interested publicity. This comes down to different personalities – Hurley the flamboyant showman, Bean the cautious – perhaps overcautious – chronicler.
This skirmish about composites occurred in the context of two other fights that Bean was engaged in. The first was with the British government’s desire to stop, or at least curtail, Australia’s efforts at gathering war trophies to be sent back to Australia for the war museum that Bean was planning. The second was a larger struggle over who was to command the Australian troops in France.
Beaverbrook and Bean were to some extent allies in the first fight. They refused to allow the British government to take first pick from the war relics that both Australia and Canada were already acquiring, with great energy, from the battlefields of France and Palestine. Bean made sure the Australian government eventually made its views plain to the British leadership; the Australians would keep what they collected. That collection became the basis of the Australian War Memorial in Canberra.
On the second fight, over who was to lead the Australian forces in France, Bean backed the wrong horse, leading him into what his biographer, Dudley McCarthy, calls ‘a serious error.’ Field Marshal Sir Douglas Haig wanted John Monash to take over from the Englishman Birdwood as the first Australian commander of the Anzac Corps. Bean and his close friend, the well-connected Keith Murdoch, wanted General Brudenell White to get the job, and they lobbied the Australian Prime Minister, WM Hughes, to stop Monash’s appointment. Bean thought Monash vain, too eager for self-promotion, and too easily misled by people telling him what he wanted to hear. Monash thought Bean a dull writer, unable to deliver the kind of thrilling war reports that the fighting deserved. Monash favoured the style of Ellis Ashmead-Bartlett, the English correspondent who had been banished from the British front after the political intrigues on Gallipolli (see With the Dardanelles Expedition, c1915). He also wished for more credit, both personal and for his troops, than Bean was willing to give.
It appears that the personality clash brought out a lack of generosity in both men. Bean attributed Monash’s flaws partly to race. ‘His ambition makes him an underground engineer. He has the Jewish capacity for worming slightly into favour without seeming to take any steps towards it’ (AWM38, 3DRL606/94/1, 3 December 1917, pp 56-57). After the war, in a letter to Gavin Long, who was the principal Australian historian in the Second World War, Bean wrote with some venom about Monash’s capabilities and foibles. While conceding that Monash ‘was probably the ablest and most successful British corps commander in France’, and ‘a very able, careful and versatile organiser’, he had a bombastic side, a necessity to ‘talk like Alexander – to be painted among bursting shells and dead men’s helmets, and to spout grandiloquent phrases about the bayonet and the front line’ (quoted in McCarthy, p 282). ‘As a matter of fact, Monash never saw a bayonet used in action, and I don’t think he so very often saw the inside of a front-line trench: and he knows practically nothing by personal experience of what went on there. I know far less about the actual fighting, or life in the front line, than most ordinary privates in the infantry or gunners or engineers do, but I know fifty times as much as Monash did.’
Monash, around the middle of 1917, had called Bean’s reporting of the battle at Messines ‘the apotheosis of banality. Not only is the language silly tosh, but his facts are for the most part, quite wrong.’ Monash had been given command in July 1916 of the Australian 3rd Division. Messines was ‘their first great battle’, which explains part of why he was so anxious that the division’s exploits in the battle were acknowledged by the correspondents. Bean would later criticise Monash’s own writing about the war: ‘He splashed his canvas with a large brush in order to produce a desired impression, with the result that his writings are full of errors in detail, not always unimportant’ (Bean’s Official History of Australia in the War of 1914-1918, Volume VI, Chapter VI, p 210).
Bean and Keith Murdoch (father of Rupert) failed in their bid to stop Monash’s appointment, but the fact that they even tried to intervene shows how significant their influence was in the highest echelons of power, not just in Australia, but in England. Murdoch had played a significant role in the end of the Gallipoli campaign (see The Hero of the Dardanelles, 1915, and Gallipoli on Film). Bean and Murdoch together attempted to influence the outcome of the soldiers’ voting in the conscription campaigns of 1916 and 1917. Both men had the confidence of, and good access to, Billy Hughes and key members of the British War Cabinet. As correspondents, they wielded significant influence with the Australian public, but they were not content to simply report events. Their actions in attempting to promote White ahead of Monash showed a desire to influence the conduct of the war itself through politics and intrigue, something Bean deplored in others. That tells us how deeply Bean felt about the issue.
The significance of the shots in the second half of this film only becomes clear in the light of these events. On the one hand, the departure of General Birdwood and General White from the headquarters at Bertangles Château in France and the knighting of John Monash in the field – the first British officer to be knighted in the field in 200 years – were newsworthy events in themselves, but to Charles Bean, these shots would have represented a personal crisis and a serious concern. General White was Bean’s closest confidant at Australian headquarters, his mentor and friend. Bean was also very close to Birdwood and concerned that his departure would affect morale among the troops, among whom Birdwood was a popular figure. Monash knew that Bean and Murdoch opposed him, and was furious at their intervention. The rift would continue through the final stages of the war, often in petty ways (see clip three), and for many years after the war. This is the only film taken on the Western Front in which we see all the major players in these dramas – including a glimpse of Charles Bean himself (at the end of clip three).
- Overview
- Curator’s notes
- Video 3 clips
- Find a copy
- Make a comment
- Map
- Extras
- Add your review